Guide
DIY fashion for beginners: sewing wrap trousers
by Vanessa Kim

In the "DIY fashion for beginners" series, Anne and I show you how to sew fashion pieces or rescue clothes. In today's episode: how to make a basket bag.
I've been looking for a basket bag with that certain something for a long time. Until I recently received a message from Pia Seidel with a link: "Look, you might like this bijou," she writes. As she knows my taste, she hits the mark with the bag. What I don't like, however, is the hefty price: 200 euros excluding customs and delivery costs. Doing it yourself is cheaper. Luckily, I can rely on Anne Chapuis to help me with this DIY project again.
What you need:
Get a basket that you like. Limit yourself to a maximum height of 20 cm. Our model is 18 cm high and has a circumference of 75 cm. Make sure that the basket is not too heavy so that the handles don't tear later if you load the bag too heavily.
To sew a matching inner bag for our basket, we need the following measurements: add the seam allowance to the circumference of our basket at the top edge. That's 75 cm + 1 cm + 1 cm (for the seam allowance on the left and right). We divide the total by 2 and get a total of 38.5 cm. The height of our basket is 18 cm. We need an additional 10 cm for the base. This brings us to 18 cm + 10 cm, i.e. 28 cm.
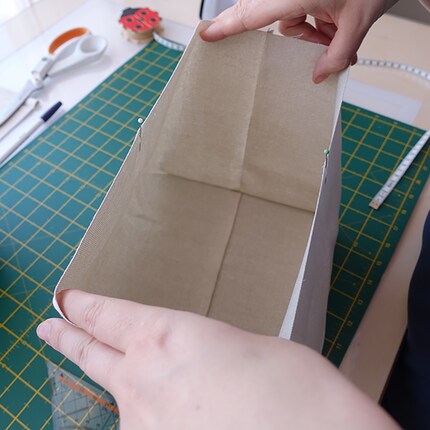
Transfer these two measurements to the fabric, which you lay on top of each other twice. Use pins to help you cut out so that the two layers of fabric do not slip. [[image:21467229 "Anne cuts out the fabric."]] [[image:21467225 "The pins mark the side and bottom seams."]]
Next, sew the side seam and the bottom of the bag together (1 cm seam allowance) where the pins are located. Choose the double lockstitch or standard stitch for this. [[image:21467239]]
Now guide the left corner on the side of the opening to the opposite corner and secure the whole thing with Güfeli. [[image:21469322]]
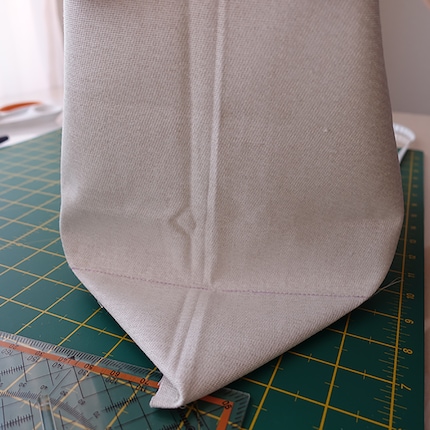
Now unfold both corners of the base so that the base and side seams are on top of each other. Precision is required here so that the sides do not become slanted. [[image:21469327,21469330]] [[image:21469331]]
Starting from the seam in the centre, measure 5 cm on each side up to the corner. This will give you the 10 cm of the bottom later. Mark these points with a fabric chalk pen and then sew exactly on the lines. [[image:21469334]]


Cut off the overlapping ends with a safety distance of 1 cm. [[image:21470551]]
The fabric bag is finished and you can sew a ruffled hem in the next step.
We have opted for 8 cm high ruffles. This results in the following fabric measurements: 18 cm high (8 cm + 8 cm + 1 cm seam allowance + 1 cm seam allowance) and 77 cm long (75 cm + 1 cm seam allowance + 1 cm seam allowance). [[image:21470552,21470597]]
Cut out the piece of fabric and mark the centre of the strip with a pin. Attach an eyelet to the left and right of the centre. You will need these later for the cord to make the bag safe from thieves. Place the eyelet on the left and right from the centre line at a distance of 3 cm. To prevent the fabric from tearing later, iron a fabric insert onto the back. Then fix the two eyelets according to the instructions from the manufacturer of your eyelet pliers. [[image:21470643]]
Once you have done this, you can sew the ruffle at a height of 1 cm so that you get a closed ring. [[image:21470642,21470686]]
Now press the side seam apart and fold the fabric in the centre.
Next, sew the froufrou fabric piece to the already sewn fabric bag, right sides together - or side seam to side seam - and fasten the whole thing together. Now just pull the cord through the eyelets. You can use a safety pin, which you pin to the cord, as an aid. This makes it easier to pull the decorative cord through the fabric tunnel. [[image:21470787,21470894]]
A chain made from tortoiseshell serves as the shoulder handle. Depending on how long they are, you can carry your bag over your shoulder later. We attach the chains directly to the raffia thanks to the existing lobster clasps. To prevent the bag from lying at an angle when you carry it, you need to attach the carabiners to the basket parallel to each other. [[image:21470895]]
Have fun with your new it-bag. I'm already enjoying the first rays of sunshine with it. [[image:21469873]]
In our next episode, we'll show you how to print your own prints with a cutting plotter. If you want more fashion DIYs on your screen, follow me by clicking on the button at my author profile.
When I’m not exploring the depths of the sea as an open water diver, I enjoy plunging into the world of fashion. On the streets of Paris, Milan and New York is where I keep my eyes peeled for the latest trends. And I’ll show you how to take them from the catwalk to your everyday life.
Practical solutions for everyday problems with technology, household hacks and much more.
Show all