Background information
Kettle barbecue tutorial part 2: How to tame the heat in your barbecue
by Daniel Haupt

Ever since George Stephen built the first kettle barbecue in the USA in 1962 - inspired by the shape of a buoy - the unceasing triumph of this very barbecue in the barbecue scene began. The design has hardly changed to this day and, in addition to Weber, other suppliers such as Rösle, Landmann, Outdoorchef, Dancook and many others also offer this form of charcoal barbecue on the market.
And rightly so: as a closed system, the kettle grill offers almost unlimited possibilities for preparing food over an open fire. But how does the kettle grill actually work and how do I operate it correctly? How do I cook different foods with its help, how do I regulate the temperature, what is the purpose of the various ventilation openings and how do I fire it up quickly and effectively?
As you can see, there are a lot of questions relating to the correct operation of the kettle grill, which I would like to address in detail in this and two other follow-up articles.
How is a kettle barbecue usually constructed? Well, the structure is similar for almost all models. The barbecue usually consists of:
The lower ventilation slider directly regulates how much oxygen is supplied to your embers. The lower slider near the embers plays a particularly important role here. The further you open the slider at the bottom, the more oxygen reaches the fuel and the hotter the embers burn.
Sounds logical? It is too! Because to get your barbecue hot, you need plenty of oxygen as well as the right charcoal.
The top fan usually remains open. It determines how much smoke and heat can remain in the ball.
If you want to "switch off" the barbecue, simply close both fans. This completely cuts off the oxygen supply and smothers the embers.
But first things first. Before you light the fire under your kettle barbecue, think about which fuel you want to use. Basically, you have the choice between briquettes and coal.
Briquettes take longer to burn through and don't glow quite as hot as coal, but they retain heat much longer than simple coal. Charcoal usually glows through very quickly and is quite a bit hotter; however, this usually ends after around 45 minutes.
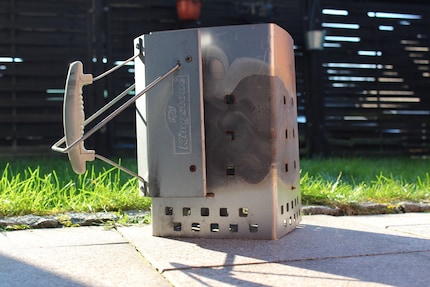
In my opinion, there is no better way to light the kettle barbecue than using a chimney starter. Simply fill the chimney starter with charcoal. The chimney then provides a small space underneath the charcoal, under which you can place barbecue lighter or simply newspaper, which you can then light. Then place the chimney on the firelighter and leave the whole thing open on the barbecue.
The coal now draws oxygen from below in the chimney starter and the heated air is drawn upwards through the chimney. Once the coals have glowed through to the top, you can pour the chimney into the barbecue. Watch out for flying sparks and wear a barbecue glove to cover your forearm if necessary. This will help you avoid unnecessary heat and potentially painful experiences.
After you have filled the charcoal into the barbecue, insert the grill grate and close the lid. Now give the barbecue at least 10 minutes to heat up properly and, above all, for the grill grate to reach the right temperature. This is because you will only get the delicious grill flavours into your food later on if the grill is really hot.
Basically, you have three different types of heat in a kettle grill:
Direct radiant heat
This heat emanates directly from your glowing briquettes and coals and radiates onto your food when you place it directly over the embers
Transfer heat
Convection heat
Convection heat is the type of heat that I can actually only generate in a closed grill system. It is the warm air that is relentlessly circulated within our sphere and within which - similar to an oven - our food can cook slowly and gently.
The following image illustrates the different types of heat once again:
(Image: www.project-bbq.de)
As a general rule, all grilled food comes into contact with the transfer heat. Whether it is on the grill grid or perhaps in a vegetable basket.
A distinction must be made between direct and indirect preparation. I use direct radiant heat to grill everything that only needs to be on the grill for a short time. This usually includes flat pieces of meat such as chops, pork neck steaks, belly meat or grilled sausages. Roughly speaking, everything that is ready after twenty minutes at the latest goes over the direct embers, otherwise it tends to turn black in the end anyway.
In the indirect area, i.e. not directly over the coals, you usually place all larger pieces, such as whole roasts, fillet pieces, meatloaf, spare ribs and generally anything that spends a long time on the grill.
Of course, indirect and direct heat can also be used in combination. The best example is the classic beef steak. It is given a beautiful grill pattern over direct, crispy heat and then cooked to perfection in the indirect area!
With kettle barbecues, it definitely doesn't matter how you put the lid on. Simply closing the lid so that the thermometer is smiling at you from the front should not be the criterion here. The reason for this is quite simple: the top ventilation opening directly influences how the air circulates in the kettle barbecue.
You should therefore close the lid so that the top vent is in the centre above the embers and the hot air can flow from below through the embers directly upwards through the outlet.
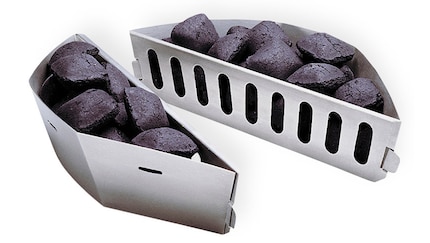
If you have placed two charcoal baskets on the left and right of the grill, the outlet should be centred between the baskets. The reason for this is that if the top outlet is only above one of the baskets, the charcoal in that basket will glow much more than in the other basket. In the worst-case scenario, you could run out of coal in the far basket.
Even if it's hard to believe at first, the coal baskets are a real gift. You can use them to arrange and handle the embers in the barbecue to your heart's content.
The charcoal baskets are not only perfect for setting up an indirect heat zone, as the pieces of charcoal are kept neatly in place. You can also use the baskets to always move the embers exactly where you need them
In practice, this means: slide the baskets apart on the sides of the sphere to place the embers on the left and right and create an indirect zone in the centre. Or place both baskets next to each other on the side to create strong embers on one side and a large indirect zone on the other side.
Or you can push both baskets together in the centre to create the so-called bull's eye. I like to do the latter to sear steaks. I then place a cast iron grid over this bull's eye in the centre and can give the steaks a nice crust there!
The best trick - especially for cooking steaks at a lower temperature after searing: You can simply remove one basket completely from the grill, halving the embers in the baskets and significantly reducing the heat inside the ball.
So you see: There really is a lot of power in the charcoal baskets and you can do more with them than you might think at first.
That's it for the basics so that you can really get started with your kettle barbecue. At a later date, I will go into more detail about how you can optimally regulate the temperature in the barbecue and give you a few good tips on how to control the heat in a targeted manner.
I was born in the Rhineland, am a project manager in IT and a family man. Away from ones and zeros and at the latest with the move into our home I have found my only true project: The barbecue!
<br /><br />
Since 2015 I have been writing about this on my blog. There I give my readers all sorts of tricks and tricks about barbecuing with charcoal and present my latest creations and ideas.
<br /><br />
You'll find more of me here:
<a href="http://project-bbq.de" target="_blank">project-bbq.de</a>
Interesting facts about products, behind-the-scenes looks at manufacturers and deep-dives on interesting people.
Show all
I already mentioned it above: The grill grate is there to transfer the grill flavours to the meat. The heat stored in the grill rack is transferred directly to the meat as it rests directly on the rack. The so-called Maillard effect then ensures that the sugars and amino acids present in the food form new compounds under the heat and create the typical roasted flavours that we love so much.


Siemens EQ700 integral TQ717D03