Guide
Smartphone photos on paper: these mini printers pass the test
by Michelle Brändle
Fabian has built a photo booth together with a colleague. And it's so good that the project here serves as an example of how you can realise something like this.
Fabian Künzli works at Digitec Galaxus AG as a Category Planning Specialist in the network, server, electrical engineering and robotics departments. He feels at home in these areas. Less so in photography, but that's not a problem. After all, a photo booth is essentially an IT system consisting of several interconnected devices - including a camera.
The idea of building a photo booth himself came to Fabian at a wedding. He was fascinated by how the simple box inspired people. Together with his colleague Sam Dumelin, he gets to work.
For us on the editorial team, Fabian is a stroke of luck. Originally, we wanted to build a photo box ourselves. Or at least clarify whether we could. For two reasons:
In my initial research and deliberations, I discover nothing but problems. Then, by chance, I learnt about Fabian's project. When he shows me his finished box, I realise that he and Sam have already solved all the problems I saw coming.
Of course, you need a printer that prints on real photo paper. Nobody wants a tattered office note as a memento. That limits the choice. For use at a larger party, however, the printer also needs to be fast, otherwise there will be queues at the photo booth. The photo paper printers I am familiar with print one or two photos per minute. That's not enough for this purpose.
Fabian's photo box contains a professional thermal printer that is intended for use in photo shops or kiosks. In other words: for a larger volume. It swallows a roll of photo paper that is sufficient for 400 pictures. The first photo is out within ten seconds. After that, it's even quicker because the printer no longer needs to warm up.
The printer is easily accessible via a separate door in the box. This opening is also the output tray for the photos, nicely illuminated with LEDs. However, Fabian is annoyed that the photos are spat out upside down and he has not yet managed to find a solution to this. The man is apparently a perfectionist.
A photo booth needs a screen on which the photos can be seen. Preferably before the photo is taken so that people know how to position themselves. If you use a tablet as the screen, then you also have a way of controlling the camera and the printer. That was my idea.
But that creates two problems. If you want to take a photo, you first have to go to the box and tap the tablet mounted on it to trigger the camera. Then you have to rush back again and get into position. This is impractical and could lead to slight blurring when taking the photo. The second problem is that there will almost certainly be a scramble for the screen if it is also used to print out the finished images.
Fabian and Sam's solution is more elegant. The camera is triggered by a foot switch. The people posing can control the camera directly where they plant themselves for the shot. There is a PC screen in the box that is used for image control. It displays the camera's viewfinder image. The screen is large enough to see enough even from a distance of two metres.
An iPad is also available for the photos taken. Party guests who have already taken their photo and now want to look at it and perhaps print it out don't get in the way of those who are taking photos. And because they only select the photos they like for printing on the iPad, the roll of paper with 400 photos should easily suffice for larger parties.
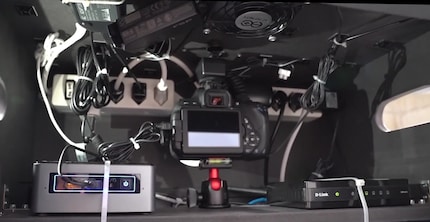
A look inside the box shows how the various parts are connected. The centrepiece is a mini PC from Intel. The camera, PC screen and printer are connected to it directly via cable. A WLAN router is also attached for the connection to the iPad. The images are stored on the NUC, which is why a version with less memory is sufficient for the iPad. Fabian was of the opinion that the PC needed more RAM.
Fabian also installed and connected PC fans in the box. It probably doesn't need them. But a real IT nerd just can't help himself.
Photo Booth software is installed on the NUC. According to Fabian, there is a whole range of such specialised programs. DslrBooth is used here. One of the reasons Fabian selected it was because it includes an iPad app that works perfectly with the PC software.
The computer is connected to a footswitch via USB. Fabian says there are also wireless footswitches. But the cable is still very practical because it means the little black thing doesn't get lost. He bought his copy from the big bad competitor with the initial letter A.
The photo box contains a Canon EOS 700D with the 18-55mm kit lens. Of the models currently available, the EOS 800D comes closest. But the exact model is not so important. The important thing is that the camera is supported by the Booth software. There is a compatibility list.
The camera and flash unit are connected to the power supply via mains adapters. This ensures that the power does not run out during the party. The mains adapter is plugged into the camera instead of the battery. For the mains adapter to be compatible, it must therefore have the same shape as the battery that fits the camera.
The camera stands on a mini tripod with an integrated spirit level for precise alignment. The flash unit is attached to the top of the box with an extension cable. A not-too-large diffuser is simply placed over the flash as a light shaper.
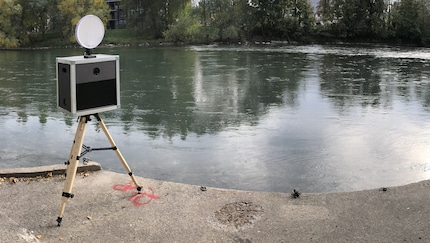
The entire box is screwed onto a solid wooden tripod, which also contains a spirit level. The stand can hold up to 50 kilograms. The box is nowhere near that heavy, but better safe than sorry. Fabian: "Even a drunk person can bump into it without everything tipping over". So the box is party-proof.
Fabian and Sam built the photo booth to rent it out. That's why there is a compact manual on the inside of the fold-out opening with QR tags that lead to instruction videos. If all else fails, there is also a hotline that offers support. For cases of hardship, the keyboard and mouse are well hidden inside the box.
We will be using this box at our next company party. Knowing our parties, it's going to be an endurance test. Photo box, show us what you can take!
My interest in IT and writing landed me in tech journalism early on (2000). I want to know how we can use technology without being used. Outside of the office, I’m a keen musician who makes up for lacking talent with excessive enthusiasm.
Practical solutions for everyday problems with technology, household hacks and much more.
Show all

The rental fee via the website for an event is 599 francs. The cheapest photo booths cost around 200 francs, but never achieve the same quality when it comes to taking and printing photos. The most expensive suppliers cost four figures. Hiring a photo box is therefore generally quite expensive. But building one yourself is hardly worth it financially - if you do it, it's for the fun of it. Fabian estimates the material costs alone for his own project at between 5,000 and 6,000 francs. It's better not to include the labour at all. It took three months from the idea to the finished box for this project. "Just putting it together took about ten days," says Fabian.


Siemens EQ700 integral TQ717D03