Product test
Knock on wood!
by Léonie de Montmollin

Dusting sawdust, lots of noise and some chaotic moments. Find out in the report what happens when an office worker meets wood.
I've been looking for a lounge for some time now. But the mass of models on sale just don't really fit our balcony. The idea of building something myself therefore grew and finally materialised.
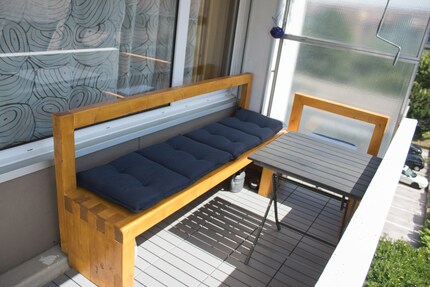
I had precise ideas for my lounge. I wanted a corner bench that you could also lie on comfortably. I had an idea, but didn't know exactly how to realise it. Here I found inspiration for my DIY project.
At the beginning, I focussed on the dimensions of the balcony. I quickly realised that a whole corner bench wouldn't fit through the balcony door. It was therefore smarter to build two loose elements. My idea of using the lounge as a bench and as a lounger was incorporated directly into the drawings. The first sketches were created and the idea developed further.
For the sake of simplicity, I decided to make everything from the same wood.
The wood slat 60x80x2500 made of spruce/fir was perfect for my idea. Product manager Pascal Biri recommended that I allow for 10% offcuts - so I ended up with 20 wooden slats.
Practical: The wood was delivered to the front door free of charge. What wasn't so practical was that the 2500 mm long slats didn't fit in the lift. This made me sweat for the first time, as the wood had to be carried up to the 4th floor.

After marking, it was time to start sawing. The battery-powered circular saw sits comfortably in the hand and is easy to guide along the wood. Oops, a small planning error. The saw cannot cut all the way through the wood in one go. The wood had to be turned and also cut from the other side. Unfortunately, even after four attempts, I was unable to cut with millimetre precision. So the sections were anything but satisfactory.
After a pause for thought, I realised: This is not going to work! I needed a bigger saw. To my great delight, a neighbour still had one that I could use for the project. Clean cuts were child's play with this thing.

All the timbers were now cut to the right size. As a test, I first stacked all the elements on top of each other so I could check that everything fitted. I used a generous amount of wood glue and 80mm and 120mm countersunk screws to join all the wooden elements together
.

I drilled 3cm holes in the slat with the drill. I used 4-6 screws per wooden slat and countersunk them 2mm into the wood. Working on the covered room floor turned out to be tedious. The work was back-breaking and is not recommended. A workroom or craft room with a workbench would have been much more practical.

I filled joints, uneven areas and screw holes with wood glue and sawdust. After drying, there were significantly fewer gaps and the construction looked nicer. The rough glue spots were then sanded down with the sanding machine.

Sand indoors or outdoors? It was rainy weather at the time, which made working outside impossible. The room was already dirty from the previous work. So I decided to continue the employees indoors and also fog the room with wood dust. I fitted a fine dust mask and off we went. Of course, the appliance has a filter that catches a lot of fine dust, but there was still a lot of dust floating around the room afterwards. Firstly, I used 120 grit sandpaper. In the second pass with the sander, I used 240-grit paper. I could still feel a slight vibration from the machine in my hands at dinner.

After all the dust and sawdust, the room first had to be thoroughly cleaned. The normal hoover had to be used and did the job surprisingly well. I then used a small dust brush to clean the two benches. Dust-free, it was time to prime. The wood stain from Auro was quick and easy to apply. As the stain is made from natural raw materials, I applied the two coats indoors without any worries. After the second coat, I had the desired colour. Incidentally, the glaze is available in many different colours.

After everything was dry, I fitted the wooden balcony lounge with comfortable seat cushions. And that's it! Now all we need is nice weather and a cold beer and there's nothing standing in the way of relaxing on the lounge.

➕ It was an interesting and exhausting project. Although the setup was simple, I found it challenging. A few mistakes were made and that was nerve-wracking. But even without any carpentry skills, a beautiful lounge was created. I am happy with the result. Of course, a carpenter who works on it every day would do a lot better.
➖ I clearly underestimated the time and effort involved. It took much longer and was more intensive than I initially thought. Fortunately, I have nice and understanding neighbours, as I was quite loud when sawing, drilling and sanding. Otherwise the project would certainly have failed early on.
As already mentioned, a large chop and mitre saw is better suited to the selected size of wood than a hand-held circular saw. [[productlist:6405457,6317549,6317560,321422,6157171,5341502,5724022,6284736,6049932,6202216,5961035,5927193,6157735]]
As a photographer, human being and dad, I tell stories as close to life as possible. With all its corners, emotions and uniqueness.
From the latest iPhone to the return of 80s fashion. The editorial team will help you make sense of it all.
Show all